1965 Dutch Grand Prix | |||
---|---|---|---|
![]() Zandvoort original layout | |||
Race details | |||
Date | 18 July 1965 | ||
Official name | XIII Grote Prijs van Nederland | ||
Location |
Circuit Park Zandvoort Zandvoort, Netherlands | ||
Course | Permanent racing facility | ||
Course length | 4.193 km (2.605 miles) | ||
Distance | 80 laps, 335.440 km (208.433 miles) | ||
Pole position | |||
Driver | BRM | ||
Time | 1:30.7 | ||
Fastest lap | |||
Driver |
![]() | Lotus-Climax | |
Time | 1:30.6 on lap 5 | ||
Podium | |||
First | Lotus-Climax | ||
Second | BRM | ||
Third | Brabham-Climax | ||
Lap leaders |
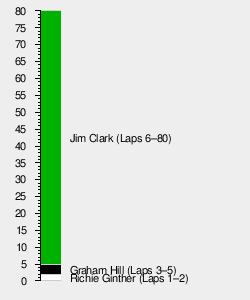
The 1965 Dutch Grand Prix was a Formula One motor race held at Zandvoort on 18 July 1965. It was race 6 of 10 in both the 1965 World Championship of Drivers and the 1965 International Cup for Formula One Manufacturers. The 80-lap race was won by Lotus driver Jim Clark after he started from second position. Jackie Stewart finished second for the BRM team and Brabham driver Dan Gurney came in third.
There was drama before the race when Lotus boss Colin Chapman punched a policeman, Chapman was arrested hours after the race but the Dutch police kept him in for two days.
Honda capitalised on their long hours of testing at Zandvoort when Ginther claimed a front-row space with Graham Hill and Clark. He shot into the lead for the first 2 laps. Hill took the lead and then Clark overtook him on lap 6. Hill fell back with rev counter problems and Stewart was left to duel with first Gurney and then Clark-ending up with a Scottish 1–2.
Pos | No | Driver | Constructor | Time | Gap |
---|---|---|---|---|---|
1 | 10 | ![]() |
BRM | 1:30.7 | — |
2 | 6 | ![]() |
Lotus-Climax | 1:31.0 | +0.3 |
3 | 22 | ![]() |
Honda | 1:31.0 | +0.3 |
4 | 2 | ![]() |
Ferrari | 1:31.0 | +0.3 |
5 | 16 | ![]() |
Brabham-Climax | 1:31.2 | +0.5 |
6 | 12 | ![]() |
BRM | 1:31.4 | +0.7 |
7 | 14 | ![]() |
Brabham-Climax | 1:32.0 | +1.3 |
8 | 8 | ![]() |
Lotus-Climax | 1:32.2 | +1.5 |
9 | 18 | ![]() |
Cooper-Climax | 1:32.6 | +1.9 |
10 | 28 | ![]() |
Brabham-BRM | 1:32.9 | +2.2 |
11 | 30 | ![]() |
Brabham-BRM | 1:32.9 | +2.2 |
12 | 4 | ![]() |
Ferrari | 1:33.1 | +2.4 |
13 | 38 | ![]() |
Lotus-BRM | 1:33.4 | +2.7 |
14 | 20 | ![]() |
Cooper-Climax | 1:33.7 | +3.0 |
15 | 26 | ![]() |
Brabham-Climax | 1:33.8 | +3.1 |
16 | 36 | ![]() |
Brabham-Climax | 1:34.1 | +3.4 |
17 | 34 | ![]() |
Lotus-BRM | 1:34.6 | +3.9 |
Source:[1] |
Pos | No | Driver | Constructor | Laps | Time/Retired | Grid | Points |
---|---|---|---|---|---|---|---|
1 | 6 | ![]() |
Lotus-Climax | 80 | 2:03:59.1 | 2 | 9 |
2 | 12 | ![]() |
BRM | 80 | +8.0 secs | 6 | 6 |
3 | 16 | ![]() |
Brabham-Climax | 80 | +13.0 secs | 5 | 4 |
4 | 10 | ![]() |
BRM | 80 | +45.1 secs | 1 | 3 |
5 | 14 | ![]() |
Brabham-Climax | 79 | +1 Lap | 7 | 2 |
6 | 22 | ![]() |
Honda | 79 | +1 Lap | 3 | 1 |
7 | 2 | ![]() |
Ferrari | 79 | +1 Lap | 4 | |
8 | 8 | ![]() |
Lotus-Climax | 79 | +1 Lap | 8 | |
9 | 4 | ![]() |
Ferrari | 79 | +1 Lap | 12 | |
10 | 38 | ![]() |
Lotus-BRM | 78 | +2 Laps | 13 | |
11 | 30 | ![]() |
Brabham-BRM | 77 | +3 Laps | 11 | |
12 | 34 | ![]() |
Lotus-BRM | 77 | +3 Laps | 17 | |
13 | 28 | ![]() |
Brabham-BRM | 55 | +25 Laps | 10 | |
Ret | 20 | ![]() |
Cooper-Climax | 48 | Oil Pressure | 14 | |
Ret | 18 | ![]() |
Cooper-Climax | 36 | Differential | 9 | |
Ret | 26 | ![]() |
Brabham-Climax | 16 | Oil Leak | 15 | |
Ret | 36 | ![]() |
Brabham-Climax | 11 | Engine | 16 | |
Source:[2]
|
|
|