Settings window
When you click on the "Delete and block" menu item, you should see a window like this.
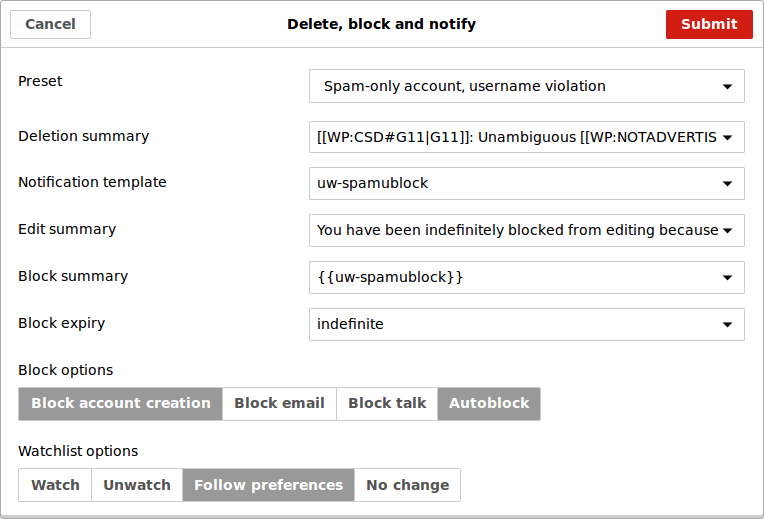
Here you can adjust all of the options that are available.
Presets
For quick and easy option adjustment, choose a preset from the Preset drop-down menu. The options in it should cover most scenarios in which you would need to delete a user page and block the user. Once you choose a preset, it will update the text input fields and the block options for you. (Watchlist options are not affected.)
Text inputs
There are five different text input boxes that you can adjust. There are two different ways you can edit these:
- Type text directly into the text box.
- Choose from a list of standard values by clicking the down arrow on the right hand side of the box.
The following input boxes are available:
- Deletion summary - this is the text that appears in the deletion log when you delete the page.
- Notification template - this is the wikitext that is added to the user's talk page after they are blocked. You will probably want to specify a complete template invocation, e.g.
((subst:User:Example/My custom block notice)) ~~~~.
- Edit summary - this is the edit summary that is used when posting the block notice on the user's talk page.
- Block summary - this is the text that appears in the block log when you block the user.
- Block expiry - the length of time the user will be blocked for.
Block options
There are four block options in addition to the block summary and the expiry. Each of these can be either turned on or off.
- Block account creation - prevents the user from creating new accounts.
- Block email - prevent the user from sending email while they are blocked.
- Block talk - prevent the user from being able to edit their own talk page while they are blocked.
- Autoblock - block edits from any IP addresses that the blocked user was using.
Watchlist options
You can choose from one of four watchlist options. The setting that you choose will affect both the page you are deleting and the user's talk page.
- Watch - always watch pages.
- Unwatch - never watch pages, and unwatch them if you were watching them previously.
- Follow preferences - follow the watchlist settings in your user preferences.
- No change - don't change the pages' watchlist statuses.
Progress notifications
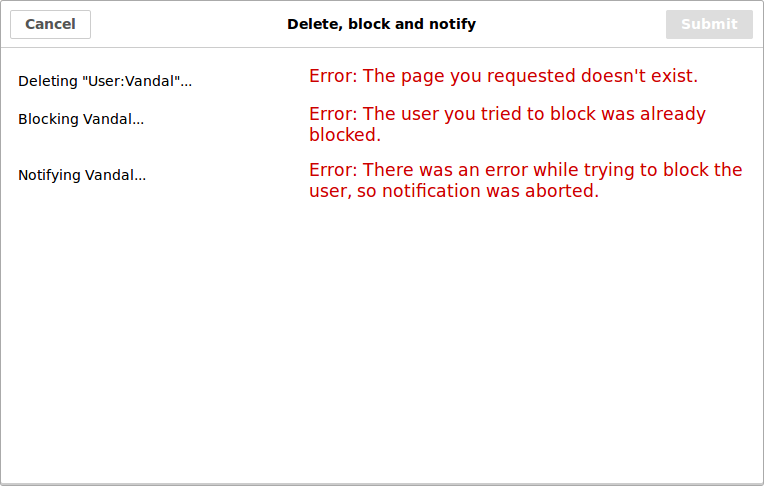
After you have finished adjusting the options, click "Submit". This will initiate the process of deleting the current page, blocking the user, and notifying them.

If the current page is successfully deleted, and the user is successfully blocked and notified, the gadget will open the user's talk page to the section they were warned at. This section will have a heading with the current month and year (in the format "Month YYYY"). If the latest section on the page already has a heading of the current month and year, then the gadget will use that rather than adding a new section.
If there were any errors during deletion, blocking, or notification, the gadget will display the relevant error messages, and the user's talk page will not be opened. The gadget isn't clever enough to know how to deal with these errors, so you won't be able to use it again until you reload the page.
Options
As well as adjusting the options each time you use the gadget, you can also change the defaults. To do this, you have to edit your common.js page.
First, add the following line directly above the line where you loaded the script:
SpamUserPage = {}; // Don't remove this line! It is necessary for SpamUserPage settings.
Then you can add custom defaults directly below that, and above the line where you loaded the script. So your common.js page should contain code that looks something like this:
SpamUserPage = {}; // Don't remove this line! It is necessary for SpamUserPage settings.
SpamUserPage.preset = "vaublock";
SpamUserPage.template = "((subst:User:Mr. Stradivarius/uw-vaublock)) ~~~~";
SpamUserPage.watchlist = "watch";
importScript('User:Mr. Stradivarius/gadgets/SpamUserPage.js'); // Linkback: [[User:Mr. Stradivarius/gadgets/SpamUserPage.js]]
preset
SpamUserPage.preset = "vaublock";
The preset to select when the dialog is opened. The following values are available:
spamublock - Spam-only account, username violationsoablock - Spam-only accountsblock - Spammingvaublock - Vandalism-only account, username violationvoablock - Vandalism-only accountvblock - Vandalismsofterblock - Promotional username, soft blockcauseblock - Username of a non-profit, soft blockcopyrightblock - Copyright violationsmyblock - Using Wikipedia as a blog or web hostnpblock - Creating nonsense pages
You can also choose your own custom presets with this setting. The default is "spamublock".
Other settings take precedence over the preset setting. For example, if you set the preset setting to "voablock" and also added a custom deletion summary, your custom deletion summary would still be visible.
deletesummary
SpamUserPage.deletesummary = "[[WP:CSD#G11|G11]]: [[WP:SPAM|spam]] user page";
The deletion summary that appears in the "Deletion summary" text input box.
blocksummary
SpamUserPage.blocksummary = "[[WP:Spam|Spam]]-only account";
The block summary that appears in the "Block summary" text input box.
editsummary
SpamUserPage.editsummary = "You have been blocked for [[WP:SPAM|Spamming]]";
The edit summary that appears in the "Edit summary" text input box.
expiry
SpamUserPage.expiry = "1 year";
The block expiry that appears in the "Block expiry" text input box.
template
SpamUserPage.template = "((subst:User:Mr. Stradivarius/my block template)) ~~~~";
The block template that appears in the "Template" text input box.
Hint: to prevent the template and your signature from being expanded inside your common.js page itself, you can use nowiki tags inside JavaScript comments.
// <nowiki>
SpamUserPage.template = "((subst:User:Mr. Stradivarius/my block template)) ~~~~";
// </nowiki>
You can also put the nowiki tags right at the start and end of your common.js file if that is convenient for you.
nocreate
SpamUserPage.nocreate = false;
Whether users are blocked from creating accounts. This should be either true or false. The default is true.
autoblock
SpamUserPage.autoblock = false;
Whether autoblock is used. This should be either true or false. The default is true.
noemail
SpamUserPage.noemail = true;
Whether users are blocked from sending email. This should be either true or false. The default is false.
nousertalk
SpamUserPage.nousertalk = false;
Whether users are blocked from editing their user talk page while blocked. This should be either true or false. The default is false.
watchlist
SpamUserPage.watchlist = "nochange";
The watchlist settings for both the current page and the user's talk page. This can be one of "watch", "unwatch", "preferences" or "nochange". The default is "preferences".
SpamUserPage.menulocation = "p-tb";
The location of the "Delete and block" menu item. The following options are available:
- "p-personal" - your personal toolbar, with links to your user page, talk page, and preferences.
- "p-cactions" - content actions toolbar. In the Vector skin, this is the dropdown menu in the top-right that says "More". In other skins, this is the toolbar with "Read", "Edit", and "View history" tabs. This is the default.
- "p-views" (Vector skin only) - the toolbar with "Read", "Edit", and "View history" tabs.
- "p-navigation" - Menu on the left-hand side with links to "Main page" and "Contents".
- "p-interaction" - Interaction menu on the left-hand side with links to "Help" and "About Wikipedia".
- "p-tb" - Tools menu on the left-hand side with links to "What links here" and "Related changes".
SpamUserPage.menuposition = "#t-whatlinkshere";
The position of the "Delete and block" menu item in the menu specified in the "menulocation" option. This should be a CSS selector of an item in the same menu that you want the "Delete and block" link to appear directly before.
For example, if you set the link to display in the tools menu, and you want the link to appear directly before the "What links here" link, then you would set it to "#t-whatlinkshere". The list of possible values will vary depending on the menu you chose, your user rights, and what user scripts and gadgets you have installed. Common values include the following:
Views menu (Vector only)
- "#ca-watch" - directly before the star for watching pages.
Content actions menu
- "#ca-delete" - directly before the "Delete" link.
- "#ca-move" - directly before the "Move" link.
- "#ca-protect" - directly before the "Protect" link.
- "#ca-watch" - (not on Vector) directly before the star for watching pages.
Personal toolbar
- "#pt-sandbox" - directly before the "Sandbox" link.
- "#pt-preferences" - directly before the "Preferences" link.
- "#pt-betafeatures" - directly before the "Beta" link.
- "#pt-watchlist" - directly before the "Watchlist" link.
- "#pt-mycontris" - directly before the "Contributions" link.
- "#pt-logout" - directly before the "Log out" link.
Tools menu
- "#t-whatlinkshere" - directly before the "What links here" link.
- "#t-recentchangeslinked" - directly before the "Related changes" link.
- "#t-contributions" - directly before the "User contributions" link.
- "#t-log" - directly before the "Logs" link.
- "#t-blockip" - directly before the "Block user" link.
- "#t-emailuser" - directly before the "Email this user" link.
- "#t-userrights" - directly before the "User rights management" link.
- "#t-upload" - directly before the "Upload file" link.
- "#t-specialpages" - directly before the "Special pages" link.
- "#t-permalink" - directly before the "Permanent link" link.
- "#t-info" - directly before the "Page information" link.
The default behaviour is for the "Delete and block" item to be put at the end of the list when it is loaded. (Other list items loaded later may be placed after it.)
oneclick
SpamUserPage.oneclick = true;
If this option is set, you will not have the chance to change the options. As soon as the "Delete and block" menu item is clicked, the current page will be deleted, and the user will be blocked and notified. This should be either true or false. The default is false.
Warning: don't use this option if you are prone to mis-clicks! You might end up blocking Jimbo.
Custom presets
It is even possible to create your own custom presets. However, the syntax is a little bit involved. (Feel free to ask on the talk page if you get stuck.)
Custom preset settings are specified in SpamUserPage.presets. This must be a JavaScript array, and each item in the array must be a JavaScript object. Each object must have an "id" property, and can have any of the optional properties "label", "deletesummary", "editsummary", "template", "blocksummary", "expiry", "nocreate", "noemail", "nousertalk", and "autoblock". The "id" property is a unique property that identifies your preset, and the "label" property is the text that is shown in the preset dropdown menu. All the other properties are settings as described above. If you use an original "id" property then you will create a new preset, and if you use the id of an existing preset then that preset will be altered.
Perhaps it is easiest to show some examples.
This code adds one new preset called "test", with an edit summary of "just testing":
SpamUserPage.presets = [
  {
    id: 'test',
    label: 'A test preset',
    editsummary: 'just testing'
  }
];
This next example adds the "test" preset and alters the "sblock" preset to have an expiry of 1 month:
SpamUserPage.presets = [
  {
    id: 'test',
    label: 'A test preset',
    editsummary: 'just testing'
  },
  {
    id: 'sblock',
    expiry: '1 month'
  }
];


